What is an RGB LED?
LEDs are small, powerful lights that are used in many different applications. An RGB LED is a combination of 3 LEDs with different colors:
- 1x red LED
- 1x green LED
- 1x blue LED
How are different colors displayed?
An RGB LED can output different colors by mixing the 3 primary colors, red, green and blue, and also changing the intensity. So it actually consists of 3 separate LEDs, red, green and blue, housed in a single package.
Therefore, there are 4 leads, one lead for each of the 3 colors and a common cathode or anode, depending on the RGB LED type.
Mixing colors
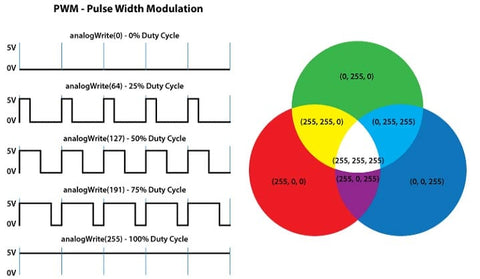
To create different colors, you can combine the three colors in different intensities. To adjust the intensity of each LED you can use a PWM signal.
Since the LEDs are very close to each other, our eyes see the result of the color combination and not the three colors individually.
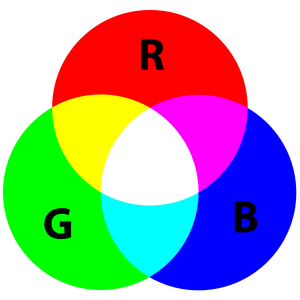
To get an idea of how you can combine the colors, take a look at the diagram below. This is the simplest color mixing diagram. However, it gives an idea of how it works and how different colors are created.
RGB LEDs with common anode and common cathode
There are two types of RGB LEDs: common anode LED and common cathode LED. The following figure shows a common anode and a common cathode LED.
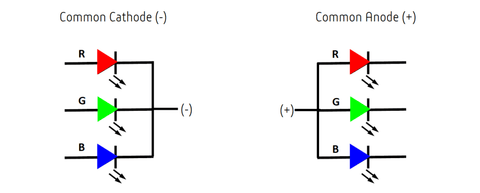
In a common cathode RGB LED, all three LEDs have a negative connection (cathode). With a common RGB LED anode, the three LEDs have a positive connection (anode).
This results in an LED that has 4 pins, one for each LED and a common cathode or anode.
In this tutorial, a cathode is used.
RGB LED Pins
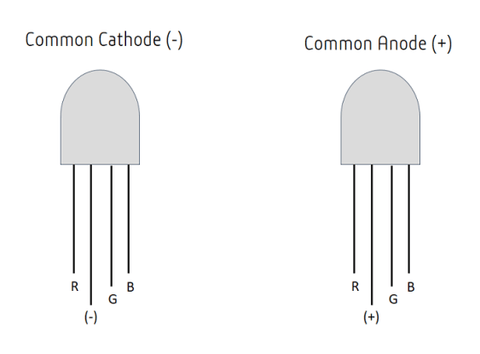
RGB LEDs have four connections (4 pins) - one for each LED and one for the common anode or cathode. You can identify each conductor by its length, as shown in the figure below.
If the LED is facing you so that the anode or cathode (the longest lead) is second from the left, the leads should be in the following order: red, anode or cathode, green, and blue.
Control an RGB LED with the Arduino
Circuit diagram
The cathode is connected to ground and the 3 anodes are connected via 220 ohm resistors to 3 digital pins on the Arduino board that can provide a PWM signal. 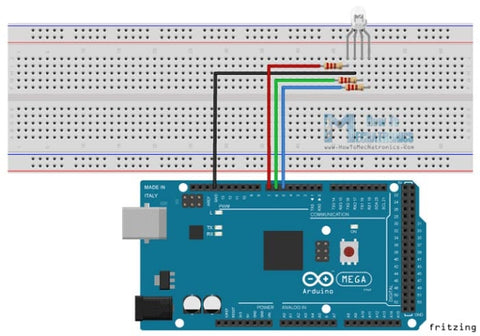
We use PWM to simulate the analog output that provides different voltage levels to the LEDs so we can get the colors we want.
Source code
In the Arduino sketch, pins number 7, 6 and 5 are used and called redPin, greenPin and bluePin. In the setup area, we need to define these as outputs. In the sketch there is a function setColor () which takes three different arguments: redValue, greenValue and blueValue. These arguments represent the brightness of the LEDs or the duty cycle of the PWM signal generated by the analogWrite () function. These values can be between 0 and 255. This corresponds to a duty cycle of 100% of the PWM signal or the maximum LED brightness.
Arduino LED Code:
int redPin= 7;
 int greenPin = 6;
 int bluePin = 5;
 void setup() {
 pinMode(redPin, OUTPUT);
 pinMode(greenPin, OUTPUT);
 pinMode(bluePin, OUTPUT);
 }
 void loop() {
 setColor(255, 0, 0); // Red Color
 delay(1000);
 setColor(0, 255, 0); // Green Color
 delay(1000);
 setColor(0, 0, 255); // Blue Color
 delay(1000);
 setColor(255, 255, 255); // White Color
 delay(1000);
 setColor(170, 0, 255); // Purple Color
 delay(1000);
 }
 void setColor(int redValue, int greenValue, int blueValue) {
 analogWrite(redPin, redValue);
 analogWrite(greenPin, greenValue);
 analogWrite(bluePin, blueValue);
 }
In the loop function, adjustments must be made so that the color of the LED changes every second. To get red light on the LED, we call the setColor () function and set the value 255 for the redValue argument and 0 for the other two. Accordingly, we can get the other two primary colors green and blue. To get other colors, we have to mix the argument values. For example, if you set all 3 LEDs to maximum brightness, you will get the color white and a violet color if you set the following values for the arguments: 170 redValue, 0 greenValue and 255 blueValue.


